Testing.

Tuesday, 26 February 2019

Dassault Mirage: What is Mirage? All we need to know about fighter jet used for surgical strike 2.0 PoK में मिराज का हमला, जानें बड़ी बातें

what is Mirage-2000?
The Mirage-2000 played a decisive role in the 1999 war of Kargil and turned it in India’s favour. This jet was used to drop laser-guided bombs to destroy well-entrenched positions of the Pakistani forces.


In early hours of the Tuesday India confirmed that it conducted air strikes at the the biggest training camp of terror out fit “Jaish-e-Mohammad” at Balakot along the line of control (LOC).
Here’s all you need to know about this Dassault Mirage-2000 fighter jet:

History: 

The Mirage-2000 is the first commissioned in 1985 and undoubtedly one of the Indian Air Force’s (IAF) most versatile and deadliest aircraft. After inducting the Mirage, IAF gave it the name — Vajra — meaning lightening thunderbolt in Sanskrit. It was developed by Dassault Aviation and took its first flight in 1978 and was inducted in the French Air Force in 1984. India had placed an initial order of 36 single-seater Mirage-2000 and 4 twin-seater Mirage 2000 in 1982 as an answer to Pakistan buying US-made F-16 fighter jets by Lockheed Martin.
Seeing the success of the jets, the government placed an additional order of 10 Mirage-2000 planes in 2004, taking the total tally to 50 jets. Then in 2011 a contract was signed to upgrade the existing Mirage-2000 jets to Mirage 2000–5 Mk, increasing the life of the jets that are now ready to serve till 2030. Dassault built an estimated 580 Mirage-2000s over a course of 30 years before replacing it with the Rafale MMC jets.

Specifications:

The Mirage-2000 uses a single shaft engine that is light and simple as compared to other fighter jet engines and is called SNECMA M53. The engine was first tested in 1970 and was not made initially for the Mirage jets. In 1974, Dassault Aviation conducted flight tests of the M53–2 version using its Mirage F1E testbeds. The majority of the Mirage 2000 is powered by the SNECMA M53-P2 engine.
The Mirage is ideally designed to seat a single fighter pilot, but can be made into a twin-seat jet depending on the armed forces’ requirements. It has a length of 14.36 metre and a wingspan of 91.3 metre. The plane weighs 7500 kg (dry) and has a total takeoff weight of 17000 kg. The Mirage 2000 has a maximum speed of Mach 2.2 (2336 kmph) and can travel 1550 km with drop tanks. The flight height is capped at 59000 ft (17km).
In comparison, Indi’as other fighter and more advanced fighter jet — the Russia made Sukhoi Su30MKI has a speed of 2120 kmph (Mach 2), slower than the Mirage-2000 and is heavier too. This gives the Mirage-2000 an advantage in quick operations. 
The Mirage 2000 has a fly-by-wire flight control system and has a Sextant VE-130 HUD, which displays data related to flight control, navigation, target engagement, and weapon firing. In terms of the armament, the Mirage 2000 can carry laser guided bombs, air-to-air and air-to-surface missiles and has a Thomson-CSF RDY (Radar Doppler Multi-target) radar on board.

Countries using Mirage 2000:

Apart from India, Dassault sold the Mirage 2000 to 8 other countries, including the home country of France, Egypt, UAE, Peru, Taiwan, Peru, Greece and Brazil. While Brazil has retired the Mirage 2000, other counties are still using this jet. A total of 583 Mirage-2000 fighter jets were built over a course of 30 years and its successor Rafael has already been ordered by the IAF.
Not only is the Mirage-2000 a trusted partner in India’s previous success in Kargil, it is also immensely capable to carry out Surgical Strikes and attacks whenever possible, thanks to its load-carrying capacity, precision, Laser Guided Bombs and latest technology updates!

Friday, 22 February 2019

Linux OS: How to install GCC the C compiler on Ubuntu 18.04 linux operating system and development environment

GCC compiler comes pre-installed on latest Ubuntu.
To check either GCC is installed on your machine or not:
Go to the Terminal by clicking on “Search Your Application Icon” and click on “Terminal” option.
Or
Press : ctrl+alt+t
Now type the below command and press enter.
gcc --version
It will show the gcc version installed on your machine.
If its showing message like "unrecognized command gcc" then gcc compiler is not installed on your machine. Then enter the below command  to install gcc compiler on your machine:

$ sudo apt-get install gcc

The above command install gcc compiler on our Ubuntu machine.

Note :
If you are developer then you need to install build-essential for "C" and "C++" for development.

Just run the below command in your terminal to install  build-essential:

$ sudo apt-get install build-essential

Now again check the Version of the gcc by typing “gcc --version” command it will show as:

Now write and execute your 1st C program:


Steps to Create First c program.

1. Create a c file with ".c" extension "MyFirstProgram.c"
2. Write the below program in "MyFirstProgram.c" file
         #include <stdio.h>
          void main()
         {
          printf("Hello this is My First C Program..!\n");
         }
3. Save it.
4. Now open terminal and go to the "MyFirstProgram.c" file location by "cd" command.
5. Now type below command to compile your "C" program:
      gcc MyFirstProgram.c -o MyFirstProgramOut 

       Here "-o MyFirstProgramOut" stores output i.e. compile code (Machine readable code) of the "MyFirstProgram.c" file after compilation.
6. Now write below command to execute the the program
      ./MyFirstProgramOut

7 Now check your output:


Java update: New methods for String class in java latest version (java jdk-11)

According to Oracle's Java Document there are six new methods are introduced in String Class.

  1. isBlank()
  2. strip()
  3. stripTrailing()
  4. stripLeading()
  5. lines()
  6. repeat(int count)

1. isBlank()

This method checks blank Strings or white spaces Strings.

It returns true if the String is empty or only white spaces codepoints, otherwise returns false.

Example:
   public class IsBlankExample
   {
       public static void main(String args[])
       {
        String s = "";
        System.out.println(s.isBlank());
        s = "I am not an Empty String";
        System.out.println(s.isBlank());
        s = "\t\t";
        System.out.println(s.isBlank());
        s = "\n";
        System.out.println(s.isBlank());
       }
   }

Output:
true
false
true
true


Note:
According to the java if the specified character (unicode code point) is white space if and only if it satisfies one of the following criteria:

  • It is Unicode space character (SPACE_SEPARATOR, LINE_SEPARATOR, or PARAGRAPH_SEPARATOR) but it is not also a non- breaking space ('\u00A0', '\u2007', '\u202F')
  • It is '\t' , U+0009 HORIZONTAL TABULATION 
  • It is '\n\, U+000A LINE FEED
  • It is \u000B' , U+000B VERTICAL TABULATION
  • It is '\f', U+000C FORM FEED
  • It is '\r', U+000D CARRIAGE RETURN
  • It is '\u001C', U+001C FILE SEPARATOR
  • It is '\u001D', U+001D GROUP SEPARATOR
  • It is '\001E', U+001E RECORD SEPARATOR
  • It is '\u001F', U+001F UNIT SEPARATOR  

2. strip():


This method strips (trims) the white spaces from the beginning and the end of the String.

Note:
If String object is empty String or if all code points are white spaces then an empty String will be returned.

Example:

public class stripExample
   {
       public static void main(String args[])
       {
        String s = "    Hello,   \tBye\t   ";
        System.out.println("#",+s);
        System.out.println("#"+s.strip()+"#");
        s = "\t   \t     \n";
        System.out.println(s.isBlank());
       }
   }

Output:
#    Hello,   Bye
#Hello,   Bye#
true


3. stripTrailing():


This method strips (trims) only ending white spaces of the String.

Example:
public class stripTrailingExample
   {
       public static void main(String args[])
       {
        String s = "    Hello,   \tBye\t   ";
        System.out.println("#",+s);
        System.out.println("#"+s.stripTrailing()+"#");
        s = "\t   \t     \n";
        System.out.println(s.isBlank());
       }
   }


Output:
#    Hello,   Bye
#    Hello,   Bye#
true


4. stripLeading():


This method strips (trims) only beginning white spaces of the String.

Example:
public class stripLeadingExample
   {
       public static void main(String args[])
       {
        String s = "    Hello,   \tBye\t   ";
        System.out.println("#",+s);
        System.out.println("#"+s.stripLeading()+"#");
        s = "\t   \t     \n";
        System.out.println(s.isBlank());
       }
   }


Output:
#    Hello,   Bye
#Hello,   Bye   #
true


5. lines():


This method returns a stream of lines extracted from the Strings, separated by line terminators such as '\t', '\n' etc.

A line is either a sequence of zero or more characters followed by a line terminator, or it a sequence of followed by end of the String. A line does not includes the line terminator.

The stream returned by this method contains the lines from this string in the order in which the occur.

Example:
      import java.util.List;
      import java.util.stream.Collectores;
      public class linesExample
      {
          public static void main (String args[])
          {
           String s = "Hi\nHello\rBye"
           System.out.println(s);
           List lines = s.lines().collect(Collectors.toList());
           System.out.println(lines);
          }
      }

Output:
Hi
Hello
Bye
[Hi, Hello, Bye]


6. repeat(int count):


This method repeats the String as many times we passed to the int count value. Here count represents number of times Strings to be repeat.

It Returns an empty String if String is empty or count is zero.

If count is negative integer then it will throw IllegalArgumentException.

Example:
   public class repeatExample
   {
      public static void main(String args[])
      {
        String s = "Hello";
        System.out.println(s.repeat(3));
        s = "Bye";
        System.out.println(s.repeat(2));
      }
   }
Output:
Hello
Hello
Hello
Bye
Bye

Sunday, 17 February 2019

Selenium Webdriver tutorial: What is selenium webdriver and how it works ? Architecture of selenium webdriver.


Selenium webdriver is a set of libraries and APIs which interact with web application. It is used for automating browser and testing the application is working as expected or not.

In simple words we can say selenium webdriver is a browser automation framework that accepts commands as a script and send it to the browser to mimic as real user.
Architecture of Selenium WebDriver:


There are four components are there in Selenium WebDriver components:
  1. Selenium Language Buildings
  2. JSON Wire Protocol
  3. Browser Drivers
  4. Real Browsers
1. Selenium Language Buildings

As we know selenium supports multiple libraries like Java, Ruby, Python, C# etc. for that selenium developers have developed language buildings to allow selenium to support multiple languages. We can download all supported languages buildings from official website (https://www.seleniumhq.org/download/#client-drivers) of selenium.
2. JSON Wire Protocol

JSON (JavaScript Object Notation) is used for transferring data between server and a client. JSON wire protocol is a REST API that transfer the information between HTTP Server. Each browser driver (such as firefoxDriver, ChromeDriver, EdgeDriver...ect) have their own HTTP server.

3.  Browser Drivers

Each browser have their own browser driver. Browser driver establish the secure connection with the browser without revealing the internal logic of browser's functionality. When browser driver receives any commands then that command is executed on that respective browser and response will go back in the form of HTTP response.

  • When we execute test script using Webdriver HTTP request is generated and send to the browser driver for each selenium command.
  • The driver receives HTTP request through HTTP server.
  • HTTP server decides all steps to perform instruction which are executed on browser.
  • Each execution status is sent back to the HTTP server which is subsequently sent back to the automation script.

4. Real Browsers

Browsers supported by Selenium WebDriver:

  • Firefox browser
  • Chrome browser
  • Edge browser
  • Safari browser
  • Opera browser 

Monday, 11 February 2019

Ruby on Rails: Some Static Code analysers in ruby on rails

What is Overcommit?
Overcommit is a tool to manage and configure Git hooks.

Installation

Add below line into your Gemfile.
gem 'overcommit'
Now we need to create a configuration file in root directory for overriding default hooks.
Name of configuration file should be .overcommit.yml. And it will look like this.
CommitMsg:
  ALL:
    requires_files: false
    quiet: false
EmptyMessage:
    enabled: true
    description: 'Check for empty commit message'
    quiet: true
TrailingPeriod:
    enabled: true
    description: 'Check for trailing periods in subject'
PreCommit:
  ALL:
    problem_on_unmodified_line: report
    requires_files: true
    required: false
    quiet: false
AuthorEmail:
    enabled: true
    description: 'Check author email'
    requires_files: false
    required: true
    quiet: true
    pattern: '^[^@]+@.*$'
AuthorName:
    enabled: true
    description: 'Check for author name'
    requires_files: false
    required: true
    quiet: true
MergeConflicts:
    enabled: true
    description: 'Check for merge conflicts'
    quiet: true
    required_executable: 'grep'
    flags: ['-IHn', "^<<<<<<<[ \t]"]
RailsSchemaUpToDate:
    enabled: true
    description: 'Check if database schema is up to date'
    include:
      - 'db/migrate/*.rb'
      - 'db/schema.rb'
TrailingWhitespace:
    enabled: true
    description: 'Check for trailing whitespace'
    required_executable: 'grep'
    flags: ['-IHn', "[ \t]$"]
    include: '**/*.rb'
  RuboCop:
    enabled: true
    on_warn: fail
  Fasterer:
    enabled: true
    on_warn: fail
  Reek:
    enabled: true
    on_warn: fail
  RailsBestPractices:
    enabled: true
    on_warn: fail
    command: ['rails_best_practices', '--config', 'config/rails_best_practices.yml']
  HamlLint:
    enabled: true
    on_warn: fail
  ScssLint:
    enabled: true
    on_warn: fail
  HardTabs:
    enabled: true
    on_warn: fail
  BundleCheck:
    enabled: true
    on_warn: fail
  EsLint:
    enabled: true
    on_warn: fail
  CoffeeLint:
    enabled: true
    on_warn: fail
PrePush:
  Brakeman:
    enabled: true
    on_warn: fail
Few of above hooks are self descriptive, So I will describe rest of them.

Rubocop
RuboCop is a Ruby static code analyser and code formatter. Out of the box it will enforce many of the guidelines outlined in the community Ruby Style Guide.

Installation

Please add following lines to your Gemfile
gem 'rubocop', require: false
Fasterer
Fasterer will suggest some speed improvements which you can check in detail at the fast-ruby repo.

Installation

Please add following line to your Gemfile
gem 'fasterer'
Reek
Reek is a tool that examines Ruby classes, modules and methods and reports any Code Smells it finds.

Installation

Please add following line to your Gemfile
gem 'reek'
RailsBestPractices
rails_best_practices is a code metric tool to check the quality of Rails code.

Installation

Please add following line to your Gemfile
gem "rails_best_practices"
HamlLint
haml-lint is a tool to help keep your HAML files clean and readable. In addition to HAML-specific style and lint checks, it integrates with RuboCop to bring its powerful static analysis tools to your HAML documents.

Installation

Please add following line to your Gemfile
gem 'haml_lint', require: false
ScssLint
scss-lint is a tool to help keep your SCSS files clean and readable by running it against a collection of configurable linter rules.

Installation

Please add following line to your Gemfile
gem 'scss_lint', require: false
EsLint
ESLint is a tool for identifying and reporting on patterns found in ECMAScript/JavaScript code, with the goal of making code more consistent and avoiding bugs. In many ways, it is similar to JSLint and JSHint with a few exceptions:

Installation

If you want to make ESLint available to tools that run across all of your projects, we recommend installing ESLint globally. You can do so using npm:
$ npm install -g eslint
You should then setup a configuration file:
$ eslint --init
After that, you can run ESLint on any file or directory like this:
$ eslint yourfile.js
CoffeeLint
CoffeeLint is a style checker that helps keep CoffeeScript code clean and consistent. CoffeeScript does a great job at insulating programmers from many of JavaScript’s bad parts, but it won’t help enforce a consistent style across a code base. CoffeeLint can help with that.

Installation

To install, make sure you have a working version of the latest stable version of Node and NPM (the Node Package Manager) and then run:
npm install -g coffeelint
Brakeman
Brakeman is a static analysis tool which checks Ruby on Rails applications for security vulnerabilities.

Installation

Please add following line to your Gemfile
gem 'brakeman'

Monday, 10 September 2018

Selenium Webdriver tutorial: How to Configure Ruby in Eclipse for Automation Scripting.


In this article we are going to learn how to setup Selenium with Ruby, our tests will be written in Ruby while interfacing to Selenium’s API through ‘Gems’ on top of a specific IDE.
These are the steps to run a test in Selenium with Ruby using eclipse IDE:
  1. Download and install Ruby.
  2. Install Java (Optional but recommended for eclipse)
  3. Install Eclipse IDE.
  4. Configure Ruby with Eclipse.

Download and install Ruby

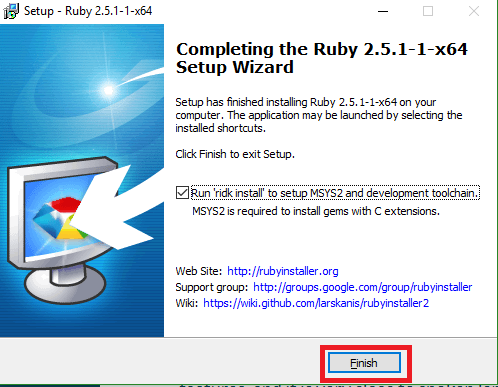
There are number of ways to install ruby, but in this article, we will use simplest way i.e. Ruby installer. To download ruby installer, enter: https://rubyinstaller.org/downloads/ and download the latest version of ruby and install it on your machine.

To know how to install ruby and set environment variable for ruby in details, enter: https://programmingyouself.blogspot.com/2018/09/how-to-install-and-set-environment.html


When installation is over, go to the “C:” drive and notice a new library is created like – “Ruby25-x64” (Here number indicates the version of the ruby)

Download & Install Java (Optional but recommended for eclipse)

To download and install latest version of Java, enterhttp://www.oracle.com/technetwork/java/javase/downloads/jdk10-downloads-4416644.html

Download & Install Eclipse IDE

To download and install latest version of Eclipse, enter: https://www.eclipse.org/downloads/


Here installation is over now launch the Eclipse by clicking eclipse Icon


Here our eclipse is launched successfully now its time for configuring ruby with eclipse

Configure Ruby with Eclipse

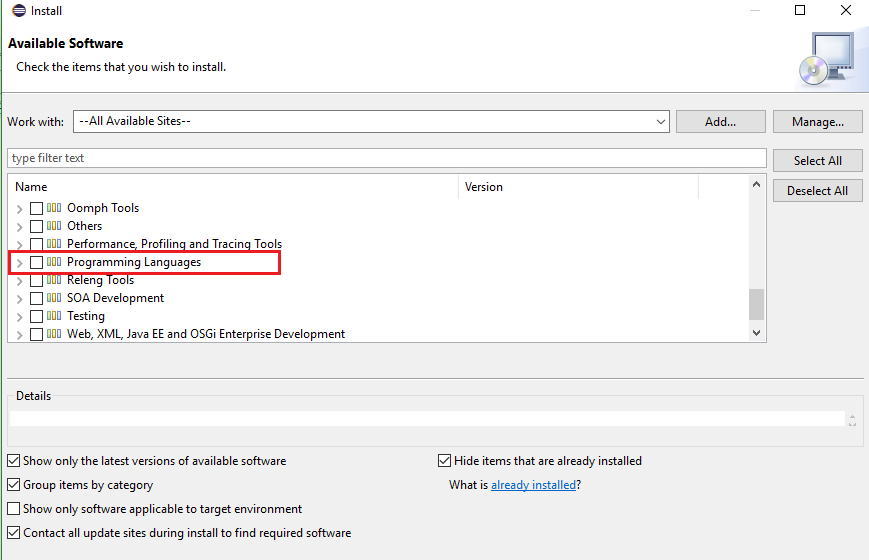
To configure ruby with eclipse Click on “Help=> Install new Software


Now Select All Available Sites (This process takes time)


Now Search for “Programming languages” and expand it


Now Search for “Dynamic Languages-Toolkit- Ruby Development Tools”, select it and click on “Next” button

At this point wait until installation finished and restart Eclipse


Now we must configure Ruby’s interpreter that will be working with Eclipse. For this click on “Windows=>Preferences” and choose Ruby’s Libraries


Now Click on “Ruby=>Interpreter=>Add


Now Click on “Browse” option, go to Ruby’s bin folder, select “ruby.exe” file and click on “OK” button.


Here our ruby is configured with eclipse for automation script now we can start scripting.

Friday, 7 September 2018

Selenium Webdriver tutorial: How to Install and set environment variable for ruby programming language on Windows-10.


  1. Download and install Ruby Installer 
  2. Set Environment Variable for Ruby

Download Ruby Installer. 


Go to downloaded location and double click on Ruby installer


Set Environment Variable for Ruby

  1. To set Environment variable first we need to check where ruby is installed
  2. To check go to the "C:\" and find ruby folder.
  3. Open Ruby folder and go to the bin folder and copy path of the ruby bin folder.
     For me its like this : C:\Ruby25-x64\bin

  • Right Click on “My Computer” => “Properties

  • Click on "Advance System settings"
  • Click on "Environment Variables"

  • Select "Path" and Click on "Edit" button in System Variables

  • Click on "New" button , "Paste" the ruby bin folder's Path here and and Click on "OK" button.

Now check whether ruby is installed successfully,  here we go to the command prompt and type the following command then hit the enter button

        Command:  ruby -v

Ruby on rails: What is Ruby programming language?

Introduction of Ruby Programming

  • Ruby is a well-known open source object-oriented programming language specially made for development client environments.
  • It has easy and clean syntax, few syntax are related to the C and C++, so it will be easy for us to understand and writing ruby code.
  • It is interpreted programming language that means whatever the code we are going to write it will be interpreted directly, it will not be compiled.
  • Ruby is also providing easy connection between different databases, we can easily make connection between MYSQL, DB-2 and Oracle etc.
  • Ruby has a rich set of built in functions which can be used directly into Ruby script.
  • Ruby is interactive in nature we can use Ruby shell and get command result immediately
  • We can write Ruby code either in the "Notepad or Notepad++", It has its own editor called RubyMine we can use it for 30 days trial version

History of Ruby

Ruby is developed by Yukihiro “Matz” Matsumoto in 1990 in Japan. His favorite languages (Perl, Smalltalk, Eiffel, Ada and Lisp) to form a new language that balanced functional programming with imperative programming.


Idea of Ruby

At that time Perl was a scripting language but comes under the category of TOY language. Python is not fully object-oriented language.  But Yukihiro “Matz” Matsumoto wanted a programming language which is completely object oriented and should be easy to use as a scripting language. At that time, he searched for this type of language, but could not find any language which matches with his requirement then he decided to develop one and developed new programming language called ruby.

Features of Ruby

  • Fully Object-oriented
  • Flexibility
  • Expressive feature
  • Dynamic typing and Duck typing
  • Exception handling
  • Garbage collector
  • Portable
  • Statement delimiters
  • Variable constants
  • Naming conventions
  • Keyword arguments
  • Method names
  • Singleton methods
  • Missing method
  • Visual appearance
Fully Object oriented
Ruby is fully object-oriented programming language. Each value in ruby is an object. Every object has a class and class has a super class.
Every code has their properties and action.
It is influenced with Smalltalk language.

Flexibility
It is a flexible programming language, programmer can easily remove, redefine or add existing parts to it. Ruby allows its users to freely alter its part as their wish.

Dynamic typing and Duck typing
Ruby is a dynamic typing programming language. Whatever the programs we write in ruby it is not compiled that’s why its called as interpreted programming language also.
All classes modules and methods are built by the code when it run.
Variables in ruby are loosely typed, that means any variable can hold any type of object. When a method is called on an object, ruby only looks up the name irrespective of the type of object.  

Tuesday, 4 September 2018

C Turorial : Buffer meaning in C progamming language.


  • Temporary storage area is called as buffer.
  • In implementation when we are passing more than required number of input values then automatically remaining values are stored into standard input buffer and these values automatically will pass to next input functionality.    
Example:
         int main()
         {
              int value1, value2;
              clrscr();
              printf ("\n Enter Value-1: ");
              scanf("%d", &value1);
              printf ("\n Enter Value-2");
              scanf("%d", &value2);
              printf("\n Sum of Value1+Value2 = %d", value1+value2);
              getch();
              return 0;
         }
Output:
         Enter Value-1: 10  20
         Enter Value-2: 
         Sum of Value1+Value2 = 30
  • In implementation when we require to remove temporary data form standard input buffer then go for flushall() or fflush().
flushall():-
  • flushall() is predefined function which is declared in <stdio.h>, by using this function we can remove the data from standard input buffer.
  • When we are working with flushall() it doesn't return any value and doesn't take any parameter.
Syntax:-
      void flushall(void);

fflush():-
  • fflush() is predefined function declared in <stdio.h>, by using this function we can clear standard input buffer data.
  • fflush() require one argument of type FILE* and doesn't returns any value.
Syntax:-
      void fflush(FILE*stream)

Example: 
          #include<stdio.h>
          #include<conio.h>
          int main()
         {
              int value1, value2;
              clrscr();
              printf ("\n Enter Value-1: ");
              scanf("%d", &value1);
              printf ("\n Enter Value-2");
              flushall(); //fflush(stdin);
              scanf("%d", &value2);
              printf("\n Sum of Value1+Value2 = %d", value1+value2);
              getch();
              return 0;
         }
Output:
         Enter Value-1: 10  20  30  //here only 10 will be accepted by compiler 20 and 30 will be  
         Enter Value-2: 30              // cleared by flushall()
         Sum of Value1+Value2 = 40